Due to the Covid-19 pandemic and the quarantining measures enacted as a result, virtual learning and meetings have become necessary to assist professionals with conducting their duties in a remote environment. Virtual team collaboration platforms have become indubitably invaluable during the pandemic. These platforms, such as Microsoft’s Teams, are being used by organizations, schools, and companies to maintain their high productivity goals in these uncertain times. Microsoft Teams is being primarily used as a communication platform in which users can message, call, conduct and engage in video meetings, and share files with one another. While all collaboration platforms are being used in a similar way, Microsoft Teams platforms is especially useful because it is regarded as highly secure with features that integrate tools such file sharing and group collaboration on Microsoft Office documents.

Using a Secondary Electronic Device as a Teaching Tool
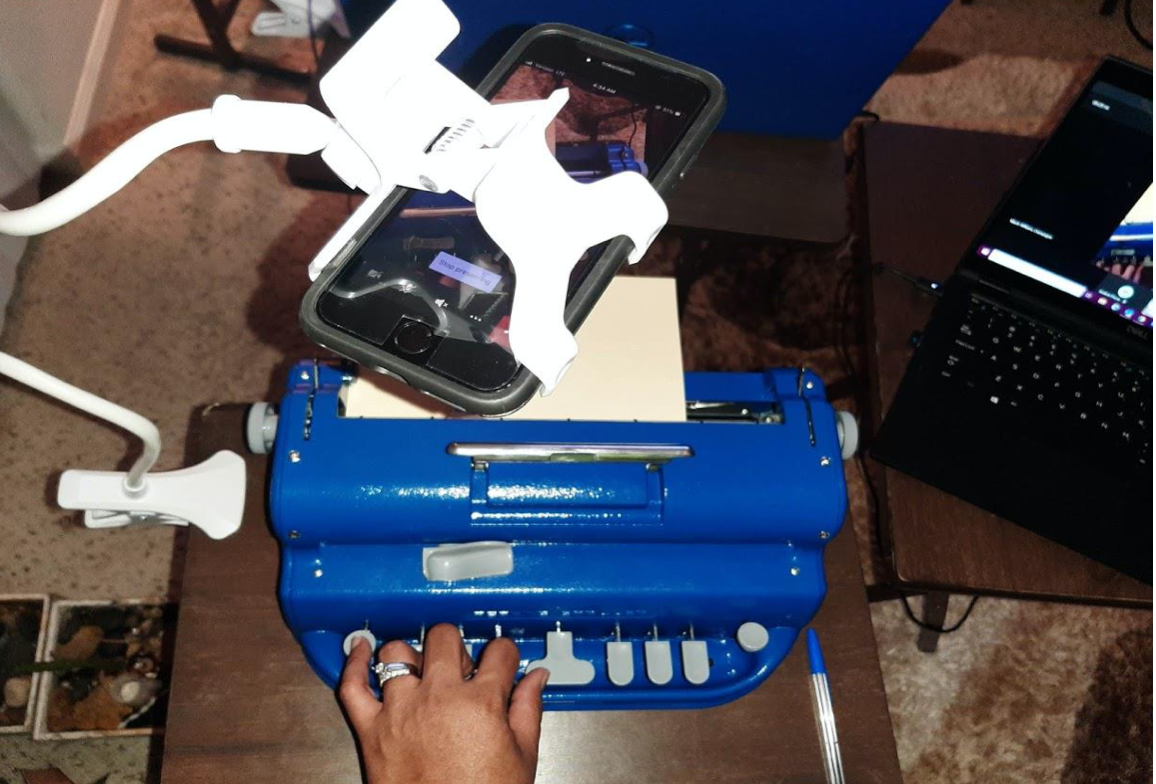
Virtual access to one another has helped our world to continue running, but nevertheless there are just some aspects of certain professional roles that work best through in-person access or modeling. For example, teachers consistently model techniques of ideas and concepts to assist with their students’ comprehension of various topics. Some students need to be able to see how to do something rather than be told how to do something. Microsoft Teams offers a way to simulate in-person modeling virtually. Microsoft Teams allows for a user’s secondary electronic device, such as a cellular telephone, to be used as a teaching tool in which the camera of the device can be used, with the assistance of a gooseneck holder, to act as a teaching tool. The use of a secondary device allows for the user to focus on something specific that the teacher wants to make clear, model, or highlight in a remote environment. For example, if a teacher of students with visual impairments is teaching a student proper finger placement on a braille writer, the teacher’s secondary camera can be added to the meeting and its camera can be focused on the teacher’s braille writer for the student to see in lieu of the teacher being in the room with the student and modeling in person. This technique is not just useful for teachers with their students, but can be useful for teachers sharing student work samples with families, modeling instructional techniques with educational teams, and engaging in trainings on not only various topics, but as a model of ho to use this particular sharing technique.
The technique of using secondary electronic devices and gooseneck electronic holders to mimic in-person access will assist in the accumulation of information that has been very difficult to obtain during this time. Attached to this article is a how-to guide giving step-by-step instructions to use this technique effectively and efficiently. The steps for this process are broken down into two sections—Accessing/ setting up the Microsoft Teams meeting and Presenting in the Microsoft Teams meeting—and are written through the lens of having two participants with four devices in one meeting. However, this method can be adapted to have more participants and devices so that more people can present their ideas and communicate in a community-like setting. Also, in the true sense of community, most devices with a camera and an option to download applications—cellular telephones, tablets—regardless of operating system (iOS, Android) can be used with this method. I hope with the addition of this method to remote environment’s theoretical toolbox of both professionals and families, that people will feel more connected and normal in this very strange and uncertain time.
A How-To Guide for Using Multiple Electronic Devices and an Electronic Device Holder to Present Information During Microsoft Teams Meetings
Each participant should have:
- At least two devices (but can be used with more)
- An internet connection
- The meeting platform (Microsoft Teams for the purpose of this training)
- A table
- A flexible gooseneck electronic device holder
Setting Up the Microsoft Teams Meeting
Steps:
- Send a Microsoft Teams invitation to the person that you want to join you in the meeting.
*Note: Though not truly needed and the invitee can access the Microsoft Teams platform via the link sent and an internet connection, it is much easier and should be encouraged if the person can download the Microsoft Teams application on their devices. When the invitee has the Microsoft Teams application downloaded on their devices, the link will automatically take them to the application.

- At the scheduled time of the meeting, both participants of the meeting should go into the invite and click “Join the meeting” with their computer FIRST! When joining the meeting on the computer, make sure that BOTH video AND audio are enabled.


After joining the meeting on the computer, open the Microsoft Teams application/ Microsoft Teams link on the second device (tablet or cellular telephone).

-
With the Microsoft Teams application the meeting should show up at the top of the screen and read “In progress: (meeting name) Want to join on this device?” next to the button “Join”. If this is the initial joining of this meeting with this device, a secondary screen will pop up and ask the question located at the top of the screen “How would you like to join on this device?” Below the question are two options: “Add this device” and “Transfer to this device”; click on “Add this device”.
-
If joining the meeting from the link, click “Click here to join the meeting” link at the bottom of the invite. The link will either redirect to the website where the meeting can be accessed via a browser or redirect to the Microsoft Teams application, if it is downloaded on the device, where the user can click “Join meeting”.
-
If the person is rejoining the meeting, the meeting should be displayed in the chat feature of the Microsoft Teams application. Click on the meeting and at the top of the screen, it should read “Meeting in progress”. Click “Join” to begin joining the meeting.
-


- When joining the meeting with the second device, please ensure that the audio is OFF and the video is ON. This will ensure that there is reduced electronic feedback. The join screen will show the video and audio options at the bottom of the screen, along with the “Join now” button with a down arrow next to it. When clicking on the arrow button, a menu will pop up. Make sure that “audio off” is checked (it will have a check next to this option). Click “Join now” after the audio has been disabled. The only audio in the meeting should be coming from each participant’s primary device.

- The presenter should admit all the participants, which should include the invitees two devices (can be seen by clicking the people icon on the top right of the computer screen in the meeting).
*Note: The organizer’s second device will not show up as a participant in the participant list. Once the organizer clicks the join button for the second device, it will automatically connect to the meeting because it is running under the same account.

- Once all the participants are in the meeting, if the invitee did not turn off their second device’s audio, the organizer can mute the audio of that device.
*Note: Please remember that all cameras should remain in the “on” position.

Presenting in the Microsoft Teams Meeting
As the presenter, a person can teach, model, or present information outside the computer, the second device will take primary focus on the screen.
Steps:
- Clamp the gooseneck holder to the side of a table.

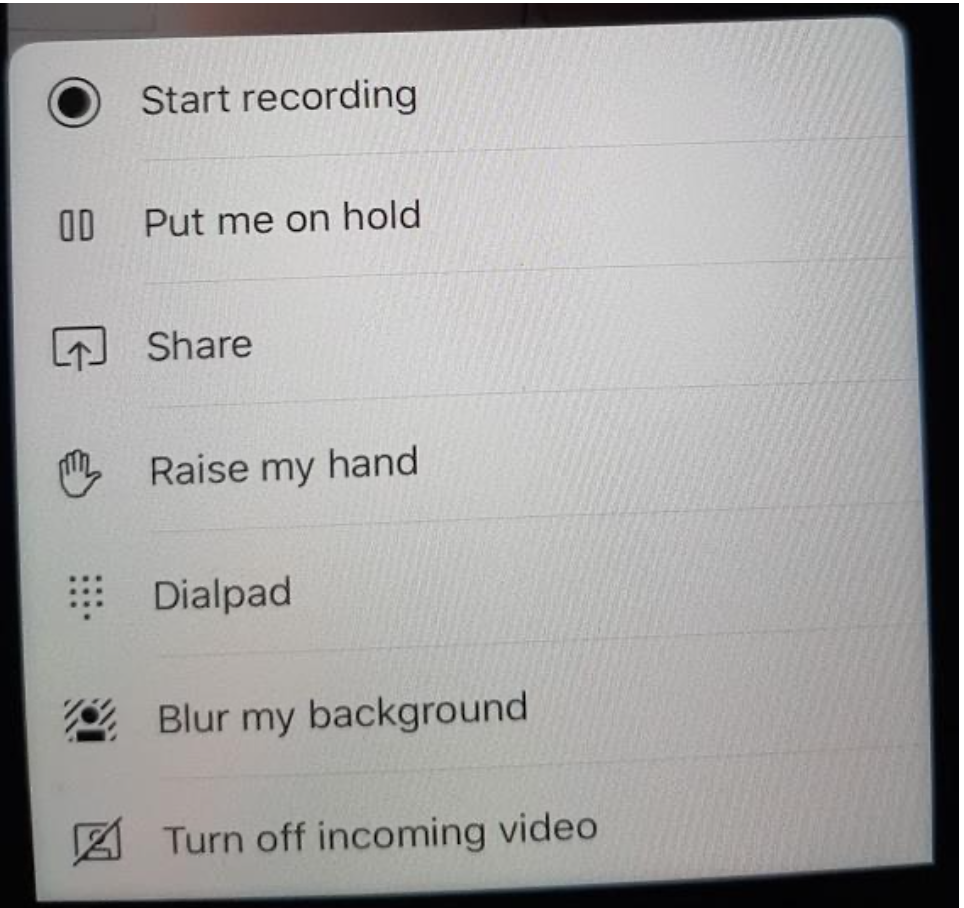
- On the secondary device, the presenter should click the three white dots at the bottom of the screen and a menu will pop up. The third option from the top of the menu will read “Share”. Click on that option.

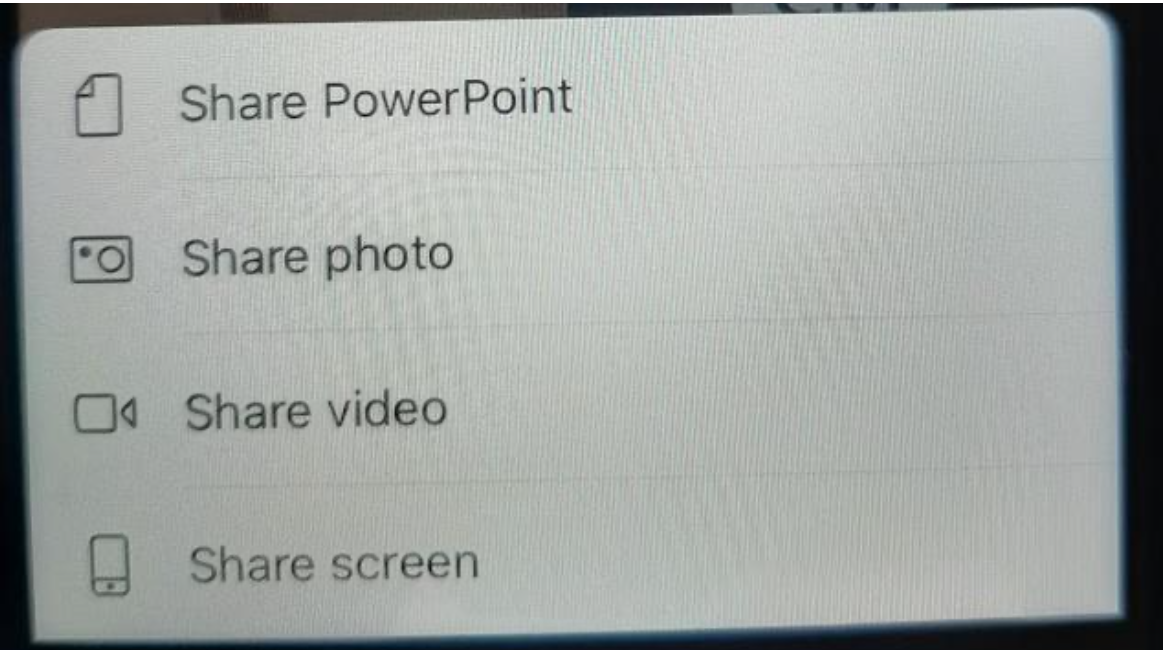
- Another menu will pop up and the third option from the top of the menu will be “Share video”. Click on that option.
- The button “Start presenting” will appear. Click on that option.
*Note: This will focus the second device’s camera as the main camera in the meeting. If it is needed to toggle between the front facing camera and the back camera of the device, press the camera icon on the screen.

- Position the device using the flexibility of the gooseneck holder to manipulate the orientation of the device to ensure optimal viewing.
*Note: Ensure that the clamps of the holder are not obstructing r pressing the camera, power, or volume buttons.


- The video presentation can be toggled between the two participants secondary devices by simply having the other user follow steps two through five. Permissions/ special access are not required for this step.
- Once the meeting is over, make sure to disconnect both devices from the meeting.