As part of the graduate coursework for Visual Impairments and Multiple Disabilities in the Teacher Preparation Program in Visual Impairments at the University of Kentucky, students were asked to complete four projects: a Story Box with at least 10 objects that correspond to the story, picture communication symbols and tactile communication symbols designed to go along with the story, and a talking book to go along with the story or represent concepts from the story.
We are sharing them on Paths to Literacy and hope that others will use them!
Story Box
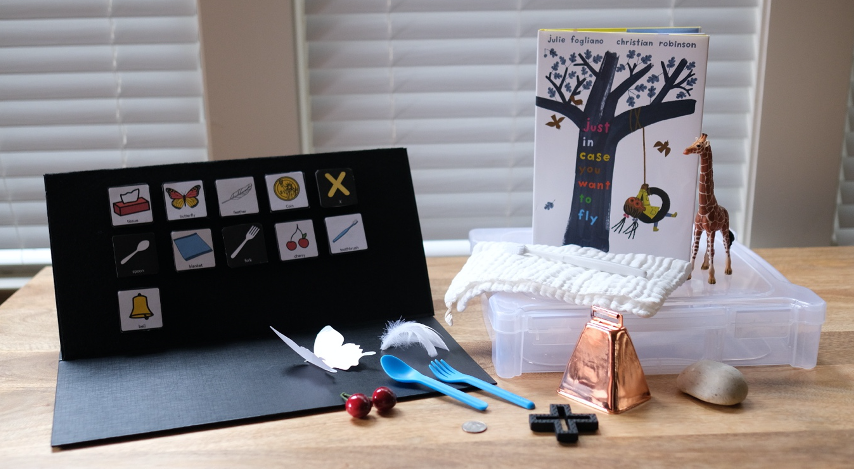
The story I chose, Just In Case You Want To Fly by Julie Fogliano and illustrated by Christian Robinson, is geared towards a pre-school audience around 2-6 years old. This is also a great book option for children with multiple disabilities. The tactile objects I chose reflect the age group and are exact representations of the objects used in the story. I love this book for kids beginning to explore object and need experience feeling direct examples of items and hearing the word for each item. This is not a highly conceptual book, so it is good for globally delayed children with low or no vision.
Materials:
Cherry, Butterfly, Feather, Coin, Fork, Spoon, Giraffe, Blanket, Tissue, Toothbrush, Rock, Bell, X (X on a map)

Procedure:
- These objects can be used in variety of ways. You can have the student group them by texture, material, soft/hardness, or in sequence of the story.
- Ask the student questions like “Which items do you have at home?”, “What items feel soft and which feel hard?” You can also ask, “Which came first, the cherry or the rock?”
- You can talk to the student about which items he or she would use to eat, which items they would use at school.
- This is a great opportunity to introduce the concept of where a feather comes from and why it is associated with flying
- It is also a great opportunity to talk about what items they use at home and why they are important. A toothbrush, a map, fork, and spoon.
- At the end of the book it discusses the child’s relationship with their mom. This would be a great time to talk about loved ones, and people who help us use these items.
- Counting how many objects we have is a great way to build math skills for students this age.
Implementation:
- I think it would be helpful for younger students to only introduce one object at a time and utilize pausing the story to allow them to adequately explore each object
- For older students that understand the objects and demonstrate being able to discern differences, I would recommend lining up the objects in order of the story line so they can feel what object comes next. Then you could lay them out and have the student find the objects as they’re read.
- When using the story box with the audio book, being in a quiet room or using headphones allows the student to maximize the sounds effects to help add context to the object. Like the sound of the rock skipping in the water while they hold the rock.
- I think using a Velcro board set up with 3 sections could be a fun way to add learning. The left hand section for the object coming up next, the middle section in the center for the current object, and the right hand section for object you just used. As the story progresses, you can move the objects through the section and be able to ask the student to go back and remember the previous one, and if possible, have them help move the objects along to help with understanding progression.
- I think it’s important to first understand what parts of the story box each student can participate in independently, if possible, so we aren’t doing things they can do themselves. So, if the adult is able to find ways to make sure at least one part of the story the student can do like indicating when they are ready to move on to the next object, to turning the page of the book, or having all the objects laid out that they find as the story is read.
Tactile Symbols
I chose to continue using the tactile objects from my Story Box. Because all of my objects were very literal representations and good building blocks for tactile association, I thought these would be great to continue building on in this age group.
My symbols are: A rock, X, blanket, cherry, coin, butterfly, feather, tissue, spoon, and fork. These are all objects young children would either be familiar with or would be beneficial to learn early and could be used for choices and age appropriate independent living skills. These could be used with core vocabulary to say things like “I want my blanket” or “I want to use my spoon.” For younger children just exploring outside or with common objects around the house, things like feeling or even hearing coin in someone’s pocket would be a great incidental learning object to understand. I would use these to also allow the child to tell someone what they hear, feel, or like/dislike. When used with the Story Box, they can be used for sorting hard and soft objects. I chose to store them in the same container as my Story Box to maintain consistence for the parent and student in learning to open and participate in set up and clean up. The tri-fold back board is the same as well for that reason. The student will remember the size/space used and have a solid background for low vision.

This is how I would display them for the student to make choices or answer questions, and the board grows as the vocabulary grows while still allowing the choices to stay in the same position for motor planning! It can lay flat or be folded for an angled and raised option to help with students who have limited range of motion.

Picture Symbols and Implementation
I think it would be helpful to encourage communication in the student by using these symbols to ask comprehension questions after the story is read and allow the student to choose their answer with these symbols. These symbols could also be used to enhance literacy by having the student line them up in the order they are presented in the story, as well as having the student group them into categories.
The symbols I chose were the tissue, butterfly, feather, coin, X, spoon, fork, blanket, cherry, toothbrush, and bell. I chose these because they are great for giving kids direct representations of what is talked about in the book. They are also some great independent living items!

Questions I would ask for comprehension would be:
- Can you tell me which items came first: tissue or coin?
- What item would you use to wipe your nose?
- Which items do you think are soft and which are hard?
- What items do you use at home?
Talking Book
I was able to use the illustration directly from the book because they are bright contrasting colors and clear lines. I added large print for low vision students. I was able to record the entire story and add important sound effects that go along with the objects being talked about. I hope this book can encourage a love of reading for new and young readers!