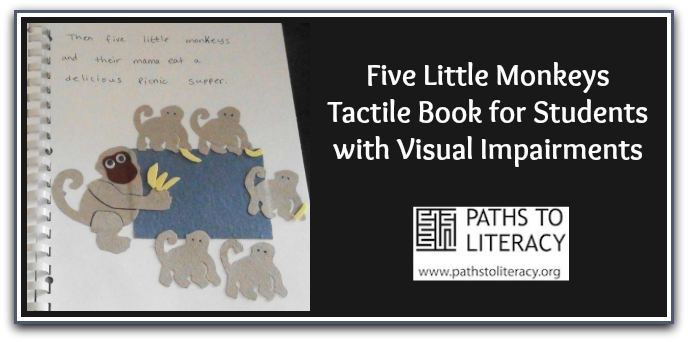
This tactile book is based on Five Little Monkeys Sitting in a Tree By Eileen Christelow and is part of the Circle Time Braille Kit: Five Little Monkeys. It is designed be used in conjunction with the Teacher’s Guide, as well as the Interactive “M” Book to help young children who are blind or visually impaired to develop emergent literacy skills, including tactile skills, counting to five, prepositions, positional concepts and the letter “m” for beginning readers at the Kindergarten level.
Book Only:
- 57 monkeys
- 6 mama monkeys
- 5 monkey tails
- 6 crocodile
- 6 rivers (water)
- 4 splashes (water)
- 11 tree trunks
- 10 tree branches
- 5 leaves
- 7 bananas
- 2 blankets
Monkeys:
Original material soft (short hair) “fur” (original material used a body pillow cover material found at Wal-Mart), Double Tack (sticky back) and blue puff paint (eyes).
- Use three sheets of Double Tack (pull of covering and stick the Double Tack to the back of the “fur” material).
- Using poster board, create outline of the monkey. (The poster board creates a stiff, heavier outline making it easier to trace.) Flip the outline model over (head is on the left) trace 57 monkeys on the Double Tack that is adhered to the “fur” material. Cut out the monkeys. (May want to do 5 extra monkeys for the Interactive Alphabet M Book.)
- Use blue puff paint for the eyes. Squirt small amount of puff paint on a paper plate. Use a toothpick to “dab” the paint to create the eyes. (The eyes are too tiny to squeeze the puff paint directly on the monkeys.)
- When ready, use an Exacto Knife to pull off the Double Tack protective covering on the back of each monkey. (The Exacto Knife will easily separate the covering from sticky part of the Double Tack.)
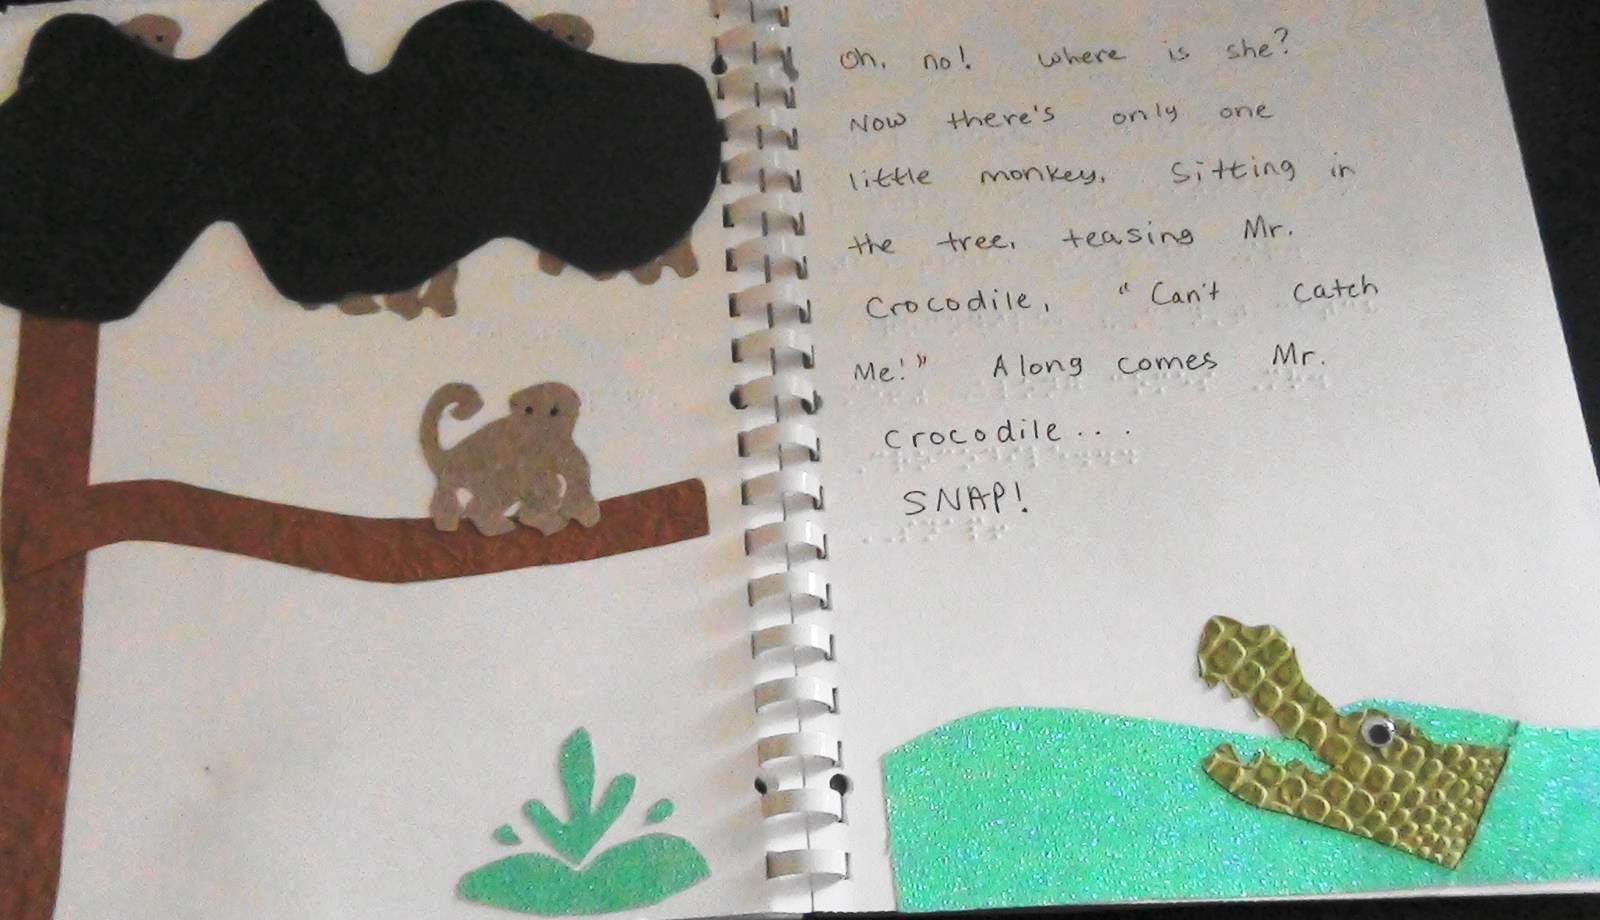
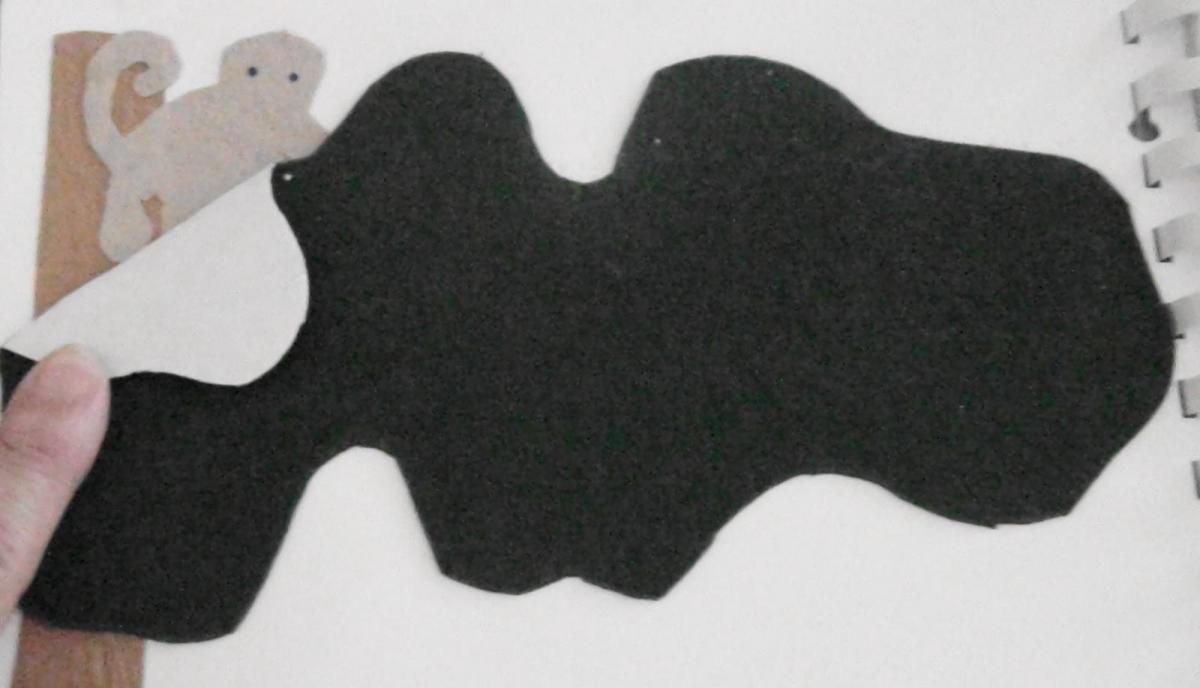
- Do NOT adhere the monkeys until the tree trunk and branch is adhered to the page. When placing monkeys under the leaves, lay the leaves (with protective covering still on) in position on the page in order to place the monkeys that go under the leaves in the correct place. Adhere all the monkeys under the leaves before adhering the leaves on that page.
- Follow the same procedure (Double Tack on the back of the material and trace the monkey tail outline and cut out).
Mama Monkey:
Original material is the same “fur” used on the smaller monkeys. Mama Monkey has an additional material for her face and tummy.
- Follow the same procedure (Double Tack on the back of the material, trace the Mama Monkey outline and cut out) for the Mama Monkey body, arms, and legs (which are stacked to give depth) and repeat the procedure with the different material for the face and tummy. Be sure to flip the outline before tracing!
- When adhering Mama Monkey on the page, place the body first, then position the arms, legs, tummy and face. Using a fine point permanent marker, outline the arms and legs if desired (for low vision students).
- Use super glue gel to adhere “googly” eyes.
Crocodile:
Original material is bumpy green scrapbooking material (found at craft stores such as Michael’s, A.C. Moore, Hobby Lobby).
- Follow the same procedure (Double Tack on the back of the material and trace the crocodile outline and cut out). Be sure to flip the outline before tracing – the crocodile outline should be facing to the right when traced on the Double Tack!
- Use Super Glue Gel to adhere the “googly eyes”, even if the googly eyes has a sticky back.
- The crocodile and river water must be adhered to the page at the same time, as the crocodile is under part of the water and on top of part of the water!
River Water:
Original material is blue “sparkly” scrapbook paper that can be found at craft stores such as Michael’s, A.C. Moore, Hobby Lobby. Ideally, use this material to represent water in every tactile book.
- Follow the same procedure (Double Tack on the back of the material and trace the river water outline and cut out). Be sure to flip the outline before tracing!
- Bend (but do not crease) the river water where you want the slit for the crocodile. Make sure that the slit is towards the right side of the river water (so that there is plenty of room for the crocodile head on the page). Using scissors, cut off a slight amount of the river water to make the slit. Do NOT cut all the way to the top or bottom of the river water, as you want to create a slit, not cut the river water in half.
- Remove the protective covering from the crocodile. Carefully slide the crocodile through the slit then adhere the crocodile head on top of the river water so that his “neck” is under the river water and his head is sticking through the slit and on top of the river water.
- Remove the protective covering from the river water and adhere it (with the crocodile head) on the page.
River Splash:
Original material is blue “sparkly” scrapbook paper that can be found at craft stores such as Michael’s, A.C. Moore, Hobby Lobby. This is the same material as the river water.
- Follow the same procedure (Double Tack on the back of the material and trace the river water outline and cut out).
Tree Trunk and Tree Branch:
Original material is the textured brown scrapbooking paper with random raised lines that can be found at craft stores such as Michael’s A.C. Moore, Hobby Lobby. Ideally, use this material to represent trees in every tactile book.
- Follow the same procedure (Double Tack on the back of the material and trace the tree trunk/branch outline and cut out).
- Adhere the tree trunk first and then the tree branch. Adhere monkeys on tree branch next; adhere the leaves last.
Leaves:
Original material is sticky back green felt that can be found at craft stores, Wal-mart, etc.
- Trace and cut out the felt leaves. Be sure to flip the outline before tracing.
- If a monkey will be hidden under a portion of the leaves, bend back that portion of the leaves. Using the Exacto Knife, slit the sticky back (do NOT cut through the felt). This allows the protective cover to stay on that portion of the felt so that the leaves can be folded down to find the hidden monkey.
- Again, adhere the tree trunk and branch first, then the hidden monkeys n the correct position, then adhere the leaves.
Blanket:
Original material is soft blue “blanket” material found at any fabric store (T-shirt scrap works well!)
- Follow the same procedure (Double Tack on the back of the material and trace the blanket and cut out).
- Adhere Mama Monkey (laying down for nap) first, then adhere the blanket.
Banana:
Original material is sticky back yellow foam found at any craft store or Wal-mart.
- Follow the same procedure (Double Tack on the back of the material and trace the banana and cut out).
Prediction Star:
Adhere foam star to upper right hand corner on the prediction page (“Oh, no! There are no little monkeys sitting in the tree. But, wait! Look!”). The prediction star alerts the teacher/parent to ask the prediction question.
*Braille book should be embossed first, print should be added, tactile pictures added and then the book should be spiral bound with front and back cover. Add braille title to front cover.
See the Teacher’s Guide for more details. See also: Circle Time Braille Kit: Five Little Monkeys and the Interactive “M” Book.
1. Read the story through with the child.
The illustrations give clues to what happens to each monkey. The words in the book lead you to think that the crocodile has eaten each monkey; however, the pictures show that instead of the monkey falling into the water, the monkey is actually hiding in the leaves of a higher branch. A small portion of the monkey sticks out from under the felt leaves. The leaves can be folded back so the student can “find” more of the monkey. Depending on the student, the teacher may decide to read the story the first time through without pointing out the “hidden” monkeys.

2. Allow the student to explore each page.
The student should be encouraged to “explore” (or search) the entire tactile illustration in order to find each hidden monkey. The tactile graphics are consistent on pages that are similar. (Example: The pages that have the repetitive phrase, “____ little monkeys, sitting in a tree, tease Mr. Crocodile. . .” only have monkeys sitting on the lower branch; there is no upper branch. The page that has “Oh, no! Where is he?” shows the upper branch with the monkeys hidden under the leaves.) On every page, encourage the student to search for and count all the monkeys.
3. Discuss fun facts about monkeys and crocodiles.
4. Read the interactive alphabet book, letter “m” to reinforce the concepts in this book.


** Please note that because of copyright law all pages have not been included here. Use your imagination to create the rest of the pages!
- Create tactile books with corresponding alphabet letter for other letters.
- Have a group of children act out the story together.