During social distancing, Zoom meetings can be a lifeline for students. They can also be very visually and auditorily complex. Here is a list of basic, broad recommendations I shared with teachers who are holding group Zoom meetings with students with CVI.
- For the hearing user with CVI: Turn on Speaker View, so you only see one person at a time.
- Everyone who is not talking, mute! Reduce the auditory complexity.
- Everyone try to use the least cluttered background in your house. Ideally, this is a solid, dark background with some source of light on the speaker. If that isn’t possible, you can try:
- To shine a light on yourself in a dark room.
- To buy a plain black flat sheet, tablecloth, or fabric to hang behind you. There are usually very cheap disposable party tablecloths at the grocery store or dollar store.
- To use a black virtual background. You can do this by saving a solid black paint image and uploading it as a virtual background. Warning: this works best with a green screen/solid background. It can make things look really strange if you don’t have the right set up for it. There are some green screens available such as this one, but they are significantly more expensive than the tablecloth option.
- Speakers should use clear, specific terms and describe what they are doing. Don’t assume a student can see what you are doing and say things like “this” or “that” and point to things.
- Slow down! Give everyone more time to process what is happening.
For Students Who Are Also DeafBlind:
If a student has CVI and uses visual sign language for receptive language, consider having one person serve as the signer/interpreter. After initial greetings, instead of speaker view, the student/parent should pin the signer’s window to the desktop and enlarge it as much as possible. Minimize any visual distractions including backgrounds and clothing. Prep in advance so the signer has the necessary materials to conduct the activity. Don’t forget to consult with your Teacher of the Deaf/Hard of Hearing or Teacher of Students who are DeafBlind for specific ideas for your students.
Materials and Lesson Ideas
Like many teachers, I have found that students and parents have very different needs related to what they can manage educationally during this time. Before buying and making individualized materials, conversations to get on the same page have been important.
Some families may be able to purchase inexpensive items to mirror the materials we are using in lessons. Others don’t have that luxury. Here are some ideas for materials that families might already have around the house:
- Black sheets, pillowcases, tablecloths, large black tee-shirts, or other black fabric to use as an uncluttered background
- Flashlights for spotlighting
- Red, yellow, or preferred-color items that are a solid color such as balls, cups, plates
- Shiny or sparkly holiday decorations such as tinsel or shiny bows
- Balloons, glow sticks, shiny beads
- Shiny metal bowls or utensils
- Food items the child finds interesting


Parents can use tape, stickers, and other colorful or shiny items to adapt their existing household items. The stars are to place on buttons on the microwave or other small appliances.

If your student uses calendar boxes, parents may have food storage containers, shoeboxes, or other materials they can attach in a row to have divided containers to sequence activities. They can use zip ties, twist ties, hot glue, tape, etc. to attach them. It’s not pretty, but it is very quick and easy for a parent to put together. This picture contains steps to make chocolate pudding.

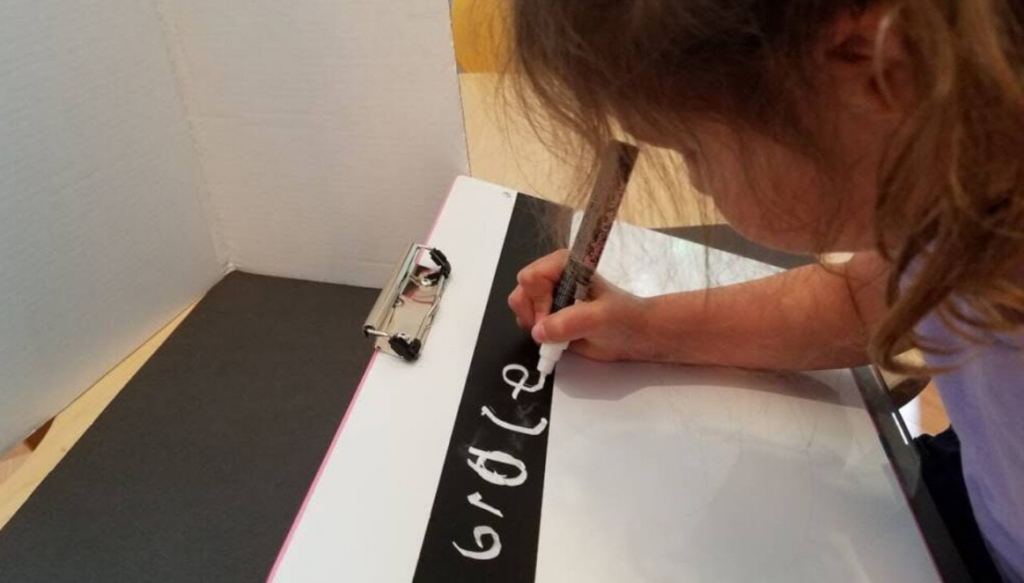
If a student does not need the tactile component of the calendar boxes and is ready to look at a sequence of more than one target, using tape on a black placemat or black paper can help them keep organized moving from left to right. This picture contains the materials to make puffy, textured paint. Many families might have these items on hand. Students can paint with a brush or with their hands, depending on their preferences. The paint dries and remains puffy, so it can be felt later. There are tons of textured paint recipes online that can be made with common household materials.

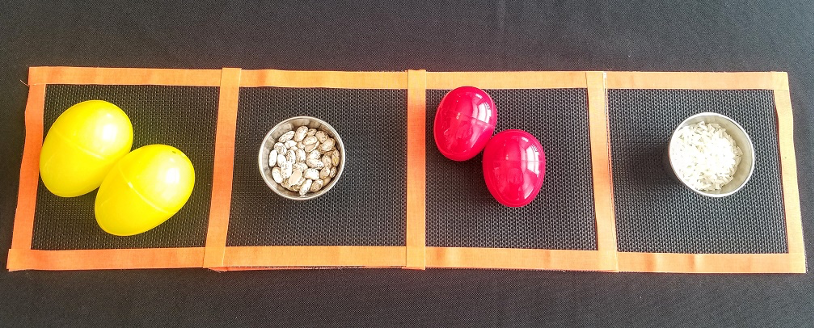
Here is a photo from a lesson on making egg shakers with different materials so students can compare sounds, weights, colors, and the way they feel when they shake them. Parents who celebrate Easter might have leftover eggs, dry beans, and rice on hand. Depending on the student’s needs related to CVI, the activity can be made simpler or more difficult. You might simplify it by only present one item at a time and spotlighting materials. You might make it more complex by searching for the eggs in containers of multiple items.

For all of these activities, step-by-step photos that can be used to create virtual (or printed, if families have printers) visual recipe books or experience books can be created in addition to the Zoom or video lesson.
If parents are able and willing to make some purchases, here are some items that could be useful:
- Black boot tray (example)
- Black jewelers’ trays (example)
- Black placemats that are easy to wipe down and can be cut to the desired size (example)
- Red, yellow, or other brightly colored tape to match your student’s preferred color
- Red Kitchen tools and utensils available at Dollar Tree stores
- Black divided trays available in party sections of many stores or online
- Brightly-colored nylon safety knives for cooking (example)
- Black self-adhesive felt sheets
- Self-adhesive hook and loop fasteners
- Black magnetic boards
- Magnets
- Wikki Stix or other sticky waxed yarn
Here are the red utensils from Dollar Tree and some nylon safety knives I had on hand at home.

I have several students who are working on simple cooking, so I sent a survey to their parents with yes or no questions about what they might enjoy cooking and what kitchen equipment they had at their disposal. I record videos and families can prepare and make the recipes at their convenience, hopefully repeatedly. I just list the required materials on a page with the video. The same can be done for craft activities.
I hope some of this is helpful. I keep reminding myself “don’t let perfect be the enemy of good.” None of this is perfect, but we are all doing the best we can with whatever tools we have available.