This was my first year working as an orientation and mobility specialist at a school for students with visual impairments. It’s been a lot of fun doing something new, but there were some aspects of my previous work as a TVI (teacher of the visually impaired) that I missed, namely teaching literacy and emergent literacy skills. I knew eventually I would find a way to incorporate more emergent literacy teaching into my work, and I’m happy to say I am starting to do so! One way I’ve been able to do this is by using 3D destination symbols with my learners who have multiple disabilities.
Currently I am using specific destination symbols with two of my middle school-aged students. They both have CVI (cortical/cerebral visual impairment), limited expressive communication repertoires, and require physical assistance for mobility. Since introducing destination symbols to my students, I’ve noticed their meaningful participation in orientation and mobility lessons has increased, and I feel good knowing I am helping them to develop symbolic language skills as well as orientation skills.
Why Use Destination Symbols
I work at a school where the majority of our students are non-ambulatory. Many rely on adult
assistance for mobility but still benefit from orientation and mobility instruction to build awareness of their surroundings, build concept understanding, and to increase participation in their travel. Using destination symbols allows the students to start to give names to different campus destinations and eventually may lead to increased communication if the student is able to use the symbols to make a choice of which destination they’d like to go to.
It can be a challenge to create meaningful O&M (orientation and mobility) lessons for students who have limited mobility due to physical limitations as well as limited communication skills. Destination symbols are a simple and effective solution to address a variety of foundational O&M skills such as attending to various visual, tactile, and auditory stimuli, visual scanning, and purposeful movement as well as emerging literacy skills like use of symbolic representation, concept development, and visual, auditory, and/or tactile discrimination skills.
Destinations on a school campus (e.g. classroom, cafeteria, school store) are more concrete
concepts for students to work on grasping than many of the abstract concepts we teach in
orientation and mobility (e.g. left and right, floor numbers, route shapes). It may make sense to
ensure students with multiple disabilities have a vocabulary for naming destinations before
tackling way finding from one destination to another.
Pictures or picture symbols certainly work well for some of our learners with visual impairments
and others may be learning to read the destination’s name in print or braille. However, not all of
my students can access 2D media or braille. 3D symbols are a great alternative to traditional
words or pictures because students can use their visual or tactile channel. One of my students is a more auditory learner, so I mounted her symbols onto a recordable speech-generating device so she is able to benefit from the audio output, as well.
How to Use Destination Symbols
Select target destinations. For one student, I selected locations where she could do a job using familiar materials. One target was the mail room, a destination she was familiar with and often takes recycling from the classroom to a bin located there. She could also take or retrieve mail or take papers to shred. The other destination I chose to target was the laundry room, where she could take laundry from the classroom, retrieve laundry, or help transfer laundry from the washer to the dryer. I liked the idea of having her do jobs with specific objects to reinforce the function of the different spaces as well as to pair objects, as well as destinations, with each symbol. For my other student, the targets I selected were the school store, the toy lending closet, and the mail room.
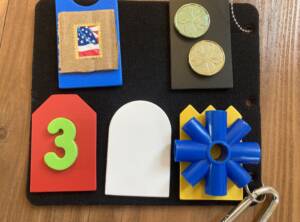
Create symbols for each destination. I tried to create symbols that were visually appealing to a student with CVI (bold colors, shiny) and distinct from one another in color, shape, and/or texture. I also tried to make the symbols relate somewhat to the destination. For example, the laundry room is a hook, the school store is a couple of gold coins, and the student’s classroom is a number three, the first number in his classroom number.
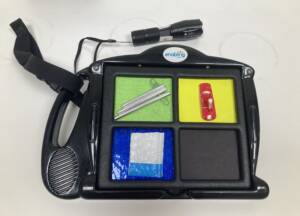
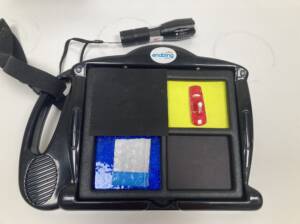
Select a presentation mode. For the student I mentioned above, I chose to mount the symbols onto a mid-tech speech generating device. This student is using something similar in the classroom and is a primarily auditory learner so I really felt like using something with sound was important. For another student, I simply chose to present the symbols two at a time on a black felt board. This way I can control how many symbols I present and whether I present the symbol alone, with a blank distractor, or with another destination symbol.

Start using your symbols, modify presentation as needed, and add more symbols. For the student using the SGD, I started with one symbol, the mail room, then added the laundry room, and then added her classroom. I found once I added the third, her performance declined, so I cut a black plastic sheet to allow me to occlude the cell(s) that I’m not targeting to reduce visual complexity for her, which has helped. For the student using the symbols on a felt board, I started using spotlighting of the target symbol as an additional cue while he is in the early learning phase and also added a symbol for his classroom.
Conclusion
Teaching orientation and mobility skills to students with visual impairments and multiple disabilities requires a lot of creativity, flexibility, and often trial and error. I’ve found using destination symbols is one strategy for orienting students to their surroundings, increasing participation in O&M lessons, and working on emergent literacy skills. I’m sharing this strategy in the hopes that some other COMS (Certified Orientation & Mobility Specialist) out there may find this strategy helpful as well.