Looking back on my own early reading and writing experiences, I have a very clear memory of my first-grade classroom’s beautiful alphabet chart hanging over the windows of our classroom. I even remember the long wooden pointer the teacher used to direct our daily recitation of the alphabet letters. This was back when direct reading instruction started in first grade. Now you will see this practice in kindergarten and even pre-K classrooms!
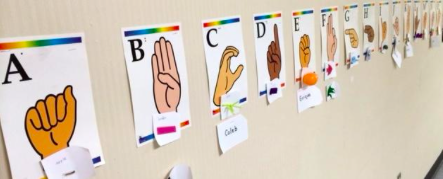
I spent a lot of time staring up at the colored pictures that started with each of the corresponding 26 letters of the alphabet. Little did I know my 6 year-old brain was incidentally building a foundation for conventional literacy skills. For example, even when I wasn’t in my classroom and I needed to spell a word with the /p/ sound, I had a visual memory of the “pig” picture on that chart. Speaking of the letter “P,” I knew it was somewhere in the middle of the alphabet, and that it came after “O” but before that letter that went with the picture of the “Quilt.” I knew the “Apple” was at the beginning of the chart, and was above my teacher’s desk while the “Z” was way over at the end, over the pencil sharpener.
This memory had the wheels in my brain turning. My first grade teacher’s alphabet chart was so eye-catching. How could I carry over all of this incidental visual information into an accessible alphabet chart that would be “brain-catching” for my VI students, many of whom had very hungry tactile and movement senses?
With the help of my TVI colleague Sheryl Katzen and really skilled Instructional Aides named Jeff and Paula, we got to work building an accessible tactile alphabet chart with our students. Below you will find some of the things we learned/continue to learn during this work-in-progress.
Use students to determine where to physically put the alphabet wall and don’t be afraid to move it or adapt it to achieve ideal access.
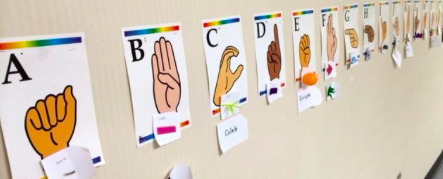
We ended up putt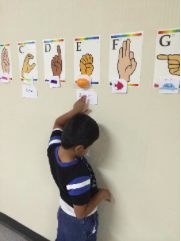 ing our tactile alphabet chart in the hallway so we could move and read at the same time. We had to play with a couple of different heights to display the media for universal access when standing up and reading symbols.
In the photograph on the left, a tactile learner reaches up to the wall to locate his own name under the symbol “egg” and braille letter “E.” His right arm is getting ready to reach up and guide the way down the rest of the alphabet.
Use symbols that have meaning tactually, and are part of a students’ daily experiences.
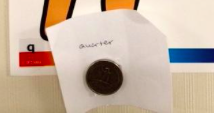
By considering the things our students touched all day long, our alphabet wall basically built itself! For example, our students have never met a “Queen” or touched her crown, and they don’t actually have a lot of experience with “Quilts” (we live in Arizona). They do touch “Quarters” all of the time though!
Foam shapes are a great example of this consideration too. Have you ever tried reading foam shapes with only your fingers? Many of our students who are still refining their tactile senses cannot tell the difference between a foam-shaped fish and a foam-shaped pumpkin. They can however tell the difference between a foam fish covered in bumpy scales (learned in a science lesson last year with a real dead fish!) and the stem of a pumpkin we cut off during Halloween.
Use a variety of words!
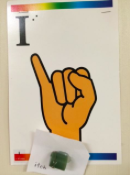
Have you ever noticed conventional alphabet charts use the same old boring nouns? Sheryl and the students came up with the top of a lotion bottle to represent the word “itch” for the letter “I.” We may have the only alphabet chart in the country with the word “itch” on it! This may be a good time to mention that our letter “U” is represented by a tactile symbol for “Underwear.” Yes, our students pretty-much rock.
Print and braille label all of the tactile symbols with their corresponding word.
Use landmarks to signify the beginning and end of the alphabet wall.
Our chart is in a hallway, so we start at a fire extinguisher and end at an intersection. If we all agree to “Meet at the /a/ sound” for our group, our students know where this is once they locate their landmark in the hallway. This is a great time to include concepts like beginning/end, start/finish, left/right, and forward/backward.
Use whole body movements to help build the connection between how the alphabet sounds and where individual letters are located.
When first learning the alphabet chart, we practiced a lot of movement next to the chart. We ran forward and sang the alphabet song at top speed. We walked backward and said the letters of the alphabet backwards. We crawled alongside the alphabet wall as the letters were sung! If our bodies stopped walking/running/crawling, the staff stopped reciting the alphabet. We even played a game called GIANT step and every time we took a huge and long step, the alphabet sounded like this: “A, G, J, P, U, etc.”
Don’t expect any output from students (e.g. speaking) until you have given ample INPUT to students. (e.g. experiencing, touching, listening, reading)
Once students have learned corresponding tactile symbols, allow time for exploring and reading the chart with no other expectations or questions from staff.
Sighted students can stare and observe a classroom alphabet chart from a distance and pick and choose which photo he/she would like to think about. How can we give VI students this same type of independence and control over the information they would like to read, at the pace they want to read it? Someone could have stopped and slowed down the student in the following video clip, but once he got started it was evident he was just trying to get down to the letter “Z” as fast as possible. On his own!
Extend the use of the Alphabet Chart to a class Word Wall.
Use new accessible Alphabet skills to teach Interactive Games.
Use the alphabet wall for assessment!
Collect data on the concepts and skills students learn as they interact with an alphabet wall every day. Here are just “some” of the things we look for:
- Left/Right
- Beginning/Middle/End
- Before/After/Between/Next To
- Phonemic Awareness
- Rhyming
- Letter and/or Sound identification
- Initial phoneme awareness
- Symbolic Relationships
- Tracking
- Finger and Hand skills
- Body awareness
- Turn-taking
- Listening/Following Directions
Build Together, Own It, Have Fun!
Take your time when building an Alphabet chart. Ours took several weeks. Our goal was utility, not fanciness. Students all have a part of the chart they can call their own. To be honest, we found several of our symbols by accident. One of our students found our “Y” tactile symbol word during snack when he proudly held up his “Yogurt” lid!
Even if students are very new to concepts surrounding the alphabet, follow their lead and use the wall to explore, experience, and interact. These should always be our early literacy and communication goals anyway!
