As part of the graduate coursework for Visual Impairments and Multiple Disabilities in the Teacher Preparation Program in Visual Impairments at the University of Kentucky, students were asked to complete four projects: a Story Box with at least 10 objects that correspond to the story, picture communication symbols and tactile communication symbols designed to go along with the story, and a talking book to go along with the story or represent concepts from the story.
We are sharing them on Paths to Literacy and hope that others will use them!
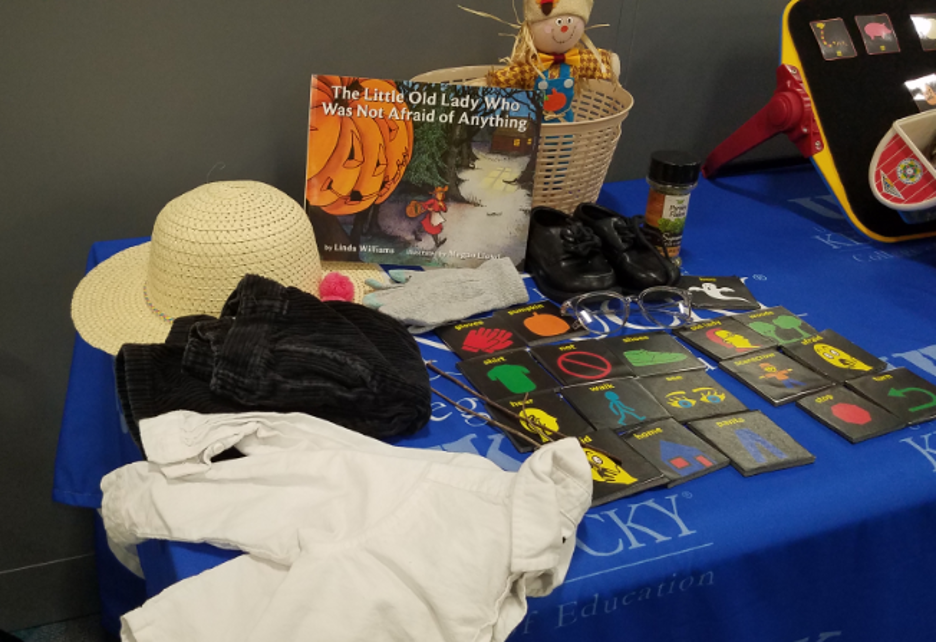
I chose The Little Old Lady Who Was Not Afraid of Anything by Linda Williams and illustrated by Megan Lloyd because it can target several language areas such as sequencing, predicting and core vocabulary. Combining the book with the story box makes it accessible and interactive for students with visual impairments and multiple disabilities. Students generally find this book fun as well.
Story Box
The story box consists of several everyday items to represent various parts of the book. For example, the story box includes a shirt, gloves, pants, shoes, and hat to represent those objects in the story. The story box also includes glasses to represent the little old lady since many little old ladies’ wear glasses. There is also oregano which can be used to represent the herbs which the little old lady collects. There are sticks which represent the forest. Sticks were chosen because they allow the students a chance to feel wood from a tree. Sticks can also be found in the woods. A small scarecrow was chosen because students with visual impairments may have never experienced a scarecrow. All items fit into a basket. The basket can be used to represent, or role play, the little old lady going out into the forest to collect herbs. The items can be used throughout the book. For example, as the shirt goes “shake shake” a student could shake the shirt. Students could also sequence the items, retell the story, and make the story come to life. I selected these materials because they were relevant to the story and easy to reproduce if anything got lost or damaged.
Tactile Symbols
- Old Lady: Foil was used to represent glasses. Foil was chosen because it feels similar to metal and some people have metal framed glasses. The student may need background knowledge that as people get older, they tend to need reading glasses. The symbol can also be compared to the physical object in the story box, which was real glasses.
- Walk: Riff raff was used and the symbol followed the symbol from the Tactile Connection Cards manual.
- Shoes: A miniature shoe was used. The student could compare the miniature shoe to their own shoe or the toddler shoe in the story box. The miniature object was chosen because it had all parts of a real shoe.
- Scarecrow: A piece of straw-like material was used. The material was chosen because real scarecrows have straw. The student would need knowledge of what a scarecrow is. They could feel the tactile symbol and relate it to the small physical scarecrow in the story box as well.
- Shirt: A piece of dress shirt fabric and 2 buttons was used. Fabric was chosen because it is the same material as the shirt used in the story box. Similarly, buttons were chosen because the shirt in the story is a button up/dress shirt. The student may need background knowledge regarding different types of shirts and shirt materials.
- Forest: A stick was used to represent the forest. The stick was chosen because you find them outside and in the forest. A student may need to know that trees have limbs and branches and that a stick is a very small part of a tree.
- Not: Tape was used to represent “not”. The “X” for not came from the Tactile Connection Cards manual.
- Afraid: 2 beads and an oval/rectangular piece of foam was used. The style of the symbol was modeled after the Tactile Connection Cards examples for happy/sad. When teaching the symbol, the student could learn that the beads represent our eyes and the foam represents our mouth. People may open their mouth and say “Ahh” if they are afraid.
- Pants: Screen material was used to represent pants. The material was chosen because it felt different enough from the shirt symbol and the student could feel the represented legs and waist of the pants. The student may benefit from discussion regarding the parts of pants, different pants material, and style of pants. They could feel the pants in the story box and compare to the card.
- Hat: Felt in the shape of a winter hat was used. The felt was chosen because many winter hats contain material similar to felt. The student can also feel “inside” the hat where someone’s head would go. The student may need background knowledge about different types of hats and materials.
- Gloves: Foam was cut out into a glove like shape. The student could feel the “fingers” on the cut out. The student may need background knowledge regarding different types of gloves and glove materials. The student could feel the physical glove from the story box and associate it with the symbol card.
- Home: A square made of cardboard with a rubber dot placed on it was used to represent a door handle.

Most of the cards displayed here are fringe vocabulary and can be combined with other core vocabulary to increase expression. However, these cards alone can be used to answer questions, sequence events, and retell the story. The cards could also be used for making predictions when reading the story. The words were chosen based on important information from the story. They also align with the picture symbols, which would allow the student to move from tactiles to picture symbols as needed. Since they have Velcro on the back, they can be placed on a Velcro board. The number of cards displayed on the Velcro board may vary depending on the student’s level. An all-in-one board would be suitable to use in conjunction with the cards. The height of the board can be adjusted depending on student needs. The cards can be stored in an index card box and then kept with the story box for easy access.
Picture Symbols
I created high contrast symbols using BoardMaker and modifying the pictures and background. The cards are on foam board with Velcro on the back. The cards can be used in conjunction with any Velcro surface. The cards can be stored in an index card box.
I chose symbols that represented items in the story such as pants, shirt, gloves, hat, shoes, pumpkin, and scarecrow. The students could use these symbols to sequence events in the story. I created a symbol to represent the little old lady because she is the main character in the story. I created verb symbols (walk/stop/see/hear) so that the student could make sentences either during the story or after (e.g., The little old lady + see + pants). I also created a symbol for “not” and “afraid” because the words come up frequently during the story. Symbols for “woods” and “home” were created to represent the location of the story. I also created a card to represent “boo” because nonverbal students could participate by saying “boo” using the symbol card.

Comprehension questions that could be asked include:
- Who was walking in the woods?
- How did the little old lady feel?
- Why was she afraid?
- Where was she walking?
- What scared her?
- What happened at the end of the story?
- What did the pumpkin say?
- Why did the crows get scared away?
- What scared the crows?
Talking Book Project
This is a talking book I created for the story The Little Old Lady Who Was Not Afraid of Anything. I used simple pictures that were modified from BoardMaker to reduce complexity and use high contrast coloring. Large print and voice recordings were used on each page as well to give access to the story to students with visual impairments and multiple disabilities.