I have been a TVI (Teacher of Students with Visual Impairments) in Kentucky for 5 years and I am currently working on my Assistive Technology certification through the University of Kentucky. For course work this semester I was given the assignment to explore and implement assistive technology supports for my students with low vision and blindness. For one of my projects I decided to explore the use of tactile symbols to support communication for a student with low vision.
I had been very intrigued by the use of tactile symbols since Mr. Abner, clinical instructor at UK (and instructor of my current AT class) did a workshop for the TVI’s in my region on building literacy and communication. I was eager to learn how to design and successfully implement the tactile symbols into everyday curriculum and all educational settings. I wanted to use these symbols with a student that I felt would greatly benefit from more communication options. In the past we had been using a communication board on the iPad and it did not seem to be giving him the access he needed.
What Are Tactile Symbols?
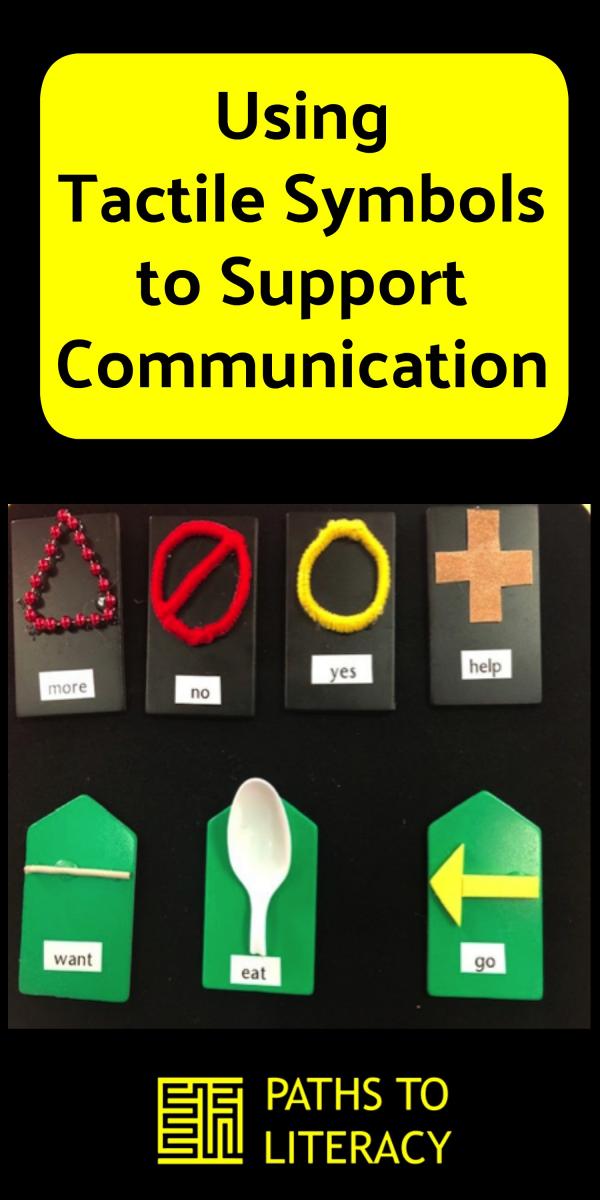
Tactile symbols refer to a range of materials that can be used to support communication, beginning with concrete objects that are part of a familiar routine activity (such as a spoon or a diaper) to a more abstract system, such as the one described here. Typically students begin with the most concrete objects embedded into the natural routine, and then move to partial objects, objects mounted on cards, and, finally to abstract symbols. This post explores the use of more abstract symbols and core vocabulary using the Tactile Connections Kit from APH.
Communication Background of Student
The student I began to use this system with is in elementary school and has complex communication needs. He has very good receptive language skills, but is non-verbal and does not use sign. He demonstrates an understanding of familar objects within his daily routine (spoon for lunch, etc.). He vocalizes with grunts or other noises when he wants or needs something. He does have some functional vision at near-point and can see large pictures, but is not currently reading print and struggles with using picture symbols. I wanted to explore more options to help him actively communicate and be more engaged in his learning.
Starting with People Cards
Using the tactile card system from the American Printing House for the Blind Tactile Connections Kit, we started with the category of people on the yellow crown shaped cards.


He used his name symbol for a variety of things. He would use his name symbol for centers or work stations to pick which one he wanted to go to at that time. He would also use his name symbol to answer the daily question, e.g. “What color are you wearing today?” He would then place his name symbol on the color of his clothing that day.
We continued with adding more symbols of people; his teacher and service providers. On the first day I only introduced the symbols of people that he had contact with on a daily basis, such as his teacher and paraprofessionals. After he seemed to know the symbols of the people he came into contact with on a daily basis (he was familiar with the symbols after 3 sessions), I then added his service providers, such as speech language pathologist, occupational therapist, physical therapist, and TVI. Learning the service providers took 5 sessions for him to master. I was very surprised at how fast he picked up the concept. Once he mastered all of those, I began to use all the “people” symbols together.


Implementation Ideas
In order to make sure that William understood the different symbols we had used on the people cards, I wanted to take the time to teach each symbol as it was introduced. These are some of the activities that we did with the tactile symbol name cards:
- Putting 3-4 symbols on his Velcro board and I made it a game of “Find that person”. He was asked to find the person my statement or hint applied to. For example, “the lady that helps you with walking”, he would then grab the physical therapist’s tactile symbol. He really enjoyed playing this game and getting to actively and tactually touch his “words”.
- I timed him to see how quickly he could find the words or names I said. He thought this was fun and he tried to do it faster each time.
- I also incorporated simple activities, such as laying the symbols on the table, then asking him to find the symbol that I stated, and then placing the symbol on his Velcro board.
- When I entered the room, we practiced getting the symbol for “Ms. Angela” so he would know it was time for me to work with him. We implemented this with all his service providers.
Collaboration
It was exciting to see how quickly William understandood the tactile cards we had made for people. After that he was ready for more tactile cards. In collaboration with his classroom teacher, we started to add core words that we thought would be most beneficial to him. These are the core words we started with: like, help, more, yes, no, go, and eat.

Activities incorporating the core words included:
- Answering “yes” and “no” questions to practice using the symbols for those words.
- William was consistently encouraged by his teacher to use these tactile communication symbols when he wanted to communicate things that these core words could be used for, such as when he wanted a snack, he would touch or go get the “eat” symbol.
- At other times I simply gave him the board with the core words and asked him touch a specific word. This basic activity enabled me to collect data on which tactile symbols he knew, but I also made a game out of it by challenging him to beat his previous score of how many he could correctly find.
Storage
When we first started, we decided to put his symbols up on a part of the bulletin board that the teacher was not using. The symbols were placed there when he was not actively using them. This way, even though he didn’t need them at that time, he could still have complete access to them when he needed. (He is in a wheelchair, but is able to move himself independently with his hands on the wheels.)

Making the Symbols More Accessible
I wanted to make the symbols more accessible to William, as well as easy for him and his teachers to manage. A couple of ways that I found to make the tactile symbols portable was to laminate a file folder and put in Velcro dots to store the name symbols. The photo on the right (below) shows a notebook with Velcro inside. We have been using this to put the core words on, which gives William a place to begin to build phrases or sentences with his tactile cards.


Tips and Lessons Learned
This is still a work in progress, but I have learned so much by documenting my journey. Some tips I have found useful:
- This communication system could be used for many different students who are non-verbal, but it is important to begin with an understanding of real objects that are associated with an activity or a person.
- Get your teachers and your service providers on board. Show them how it can be used and the benefits that it would have for everyone!
- Practice the symbols and then practice some more. Repeated practice is the way to reach proficiency.
- Make it fun and meaningful! My student loves blocks, so his name symbol is a lego block. He LOVES this and is motivated to use it.
- Keep it simple. The symbols don’t need all the hype…just something simple that isn’t too complex.
- Touch, Touch, and Touch. My student loved that he could be active with his communication, not by just touching a button, but getting to feel and explore.
- Feedback for everyone! My student loved the sensory / tactile feedback from the symbols, and we were loving the feedback we were getting from his new communication.
If you have been considering trying this for one of your students, take the plunge and do it! I had a lot of trial and error (because every student is different, right?!), but watching the outcome has been amazing!