The image above was taken by Sandy Gillam.
By Duncan McGregor, Ed.D. & Carol Farrenkopf, Ed.D.
Strategies
- Experiential learning (literacy instruction rooted in experiences)
- Link new experiences with those already learned
- Use concrete objects whenever possible
- Learn by doing
- Unify experiences
- Pair real objects with representational forms (pictures, miniatures)
- Pair real objects with symbolic forms (print, braille)
- Read aloud to and with the student
- Pretend reading by the student
- Pretend writing by the student
- Use repeated readings to build fluency and confidence
- Integrate instruction of the mechanics of reading and writing (how to turn the pages, identifying the cover of a book, finding the page number, locating the print/braille text, learning how to put the paper in a braille writer, learning how to hold a marker/crayon/pencil, the act of writing/brailling)
Building the Foundation for Literacy
- Time: Print/braille instruction every day, 1 – 2 hours per day, direct instruction as well as integrated instruction at other times of the day
- Consistency: Same teaching schedule (avoid cancellations), same teacher of the visually impaired, same teaching style, same expectations
- Exposure: Braille/print labels throughout the student’s school environment (label as much as you can), especially in the classroom
- Accessibility: Braille/print books in the classroom and school library
- Application: Opportunities to apply braille/print reading and writing skills throughout the day, in various environments (gym, office, washrooms, library)
Two Types of Books You Can Create
- Concept Books (e.g., letters, numbers, words, shapes, size, position, colours, classification/categories).
- Story Books
- Mass-produced books that can be adapted (simple, easy-to-read, large type, clear pictures)
- Photocopy of already-made books (e.g., Sunshine Series)
- Made-up stories (by you, the student, other children, parents)
Creating a Braille/Print Book
Materials:
- Two sturdy book covers (e.g., heavy construction paper, artists’ board, “real” braille book covers, file folders, cardboard)
- Binding (usually 1 inch binding is a good size… it’s easier to turn pages with larger binding); binder rings, twist-ties, pipe-cleaners, string, and floral wiring also work well.
- Braille paper (to make the pages in the book)… usually 4 – 5 pages in the book is a good number to start off with for a young child
- Crayons/coloured markers/black marker to colour pages
- Glue stick and/or hot glue gun
- Tape
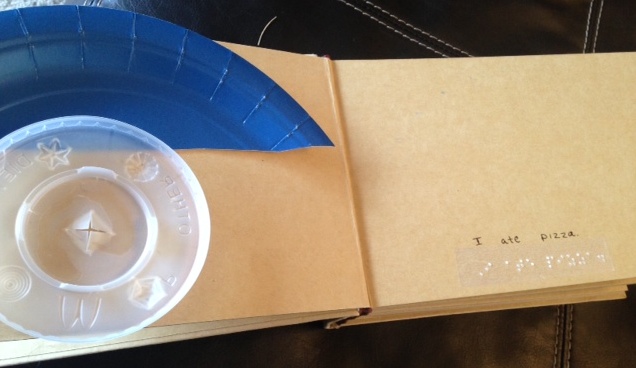
- Concrete, familiar items to put in the book that are related to the topic of the book
- Scissors
- Braille writer/slate and stylus
- Braille labeling sheets or Dymotape
- Photocopied and enlarged pages of a story (if making this type of book)
Creating a Book FOR a Student
Method:
- Determine an appropriate topic for the book.
- If creating a letter book, base the book on a letter the student already knows or is learning (start with the first letter of the child’s name).
- If creating a number book, keep the number of items on a page within the capabilities of the child (by gr. 1, most children know how to count to 30).
- If creating a shape book, consider making the cover and the pages of the book the shape of the topic (e.g., circular-shaped book about circles).
- If creating a positional book, carefully consider the placement of items on the page so as not to confuse the student.
- Indicate the page number in braille and in print on each page of the book.
- Include some sort of object on the cover that indicates what the book is about so the student can identify the book independently.
- Include a print and braille title on the cover of the book.
- Braille the text on the bottom of the page so text can be changed easily (if need be); it also allows more space for items to be put on the page.
- If the book is an enlarged photocopy of a book, colour in only one or two identifying parts of the pictures—too much colour may cause confusion; colour only what is most important (raised lines and textures may also help the student focus attention to the most important parts of the story).
- Use strong fasteners (e.g., glue, tape, pipe cleaners) to keep the objects from falling out of the book. Placing objects in plastic bags that can be opened/unzipped is also a good idea.
- Use large binding materials because all of the objects inside the book will make it an extra thick book.
- Initially, read the book together. Allow the student to guess at the content and pretend to read what it says.
- Encourage proper position of the book, fingers over the braille, scanning of the pages, and turning only one page at a time.
- Make reading the book as fun as possible!
Creating a Book WITH a Student
Method:
- Have all of the book-making materials with you (binding, covers with pre-cut binding holes, braille paper with holes, glue, objects, etc.).
- Allow the student to direct the creation of the book.
- Bring a bag or box of all the materials you think the student may want to include in his/her book—include a wide variety of items so the student may choose some items over others.
OR
- Place items that can be used in the book in the student’s classroom/work area so that he/she can “discover” them accidentally.
- Allow the student to be creative with his/her stories and the placement of objects in the books.
- If the student is creating a story based on a storybook that has already been made, review the original story first and then use that book as a model for the new one the student is creating.
- With the teacher’s assistance, the student may braille the text at the bottom of the page.
- Think about including another child in the book-making experience.
- Encourage the child to read (or pretend to read) the book aloud—encourage smooth line tracking while the child reads the line of braille).
Some Final Suggestions
- Include the books in the classroom/school library.
- Encourage the child to share his/her book with classmates.
- Allow the child to take the book home to share with friends/family.
- Start a book club.
- Have lots of fun!
This article was originally published by Texas School for the Blind and Visually Impaired (TSBVI) and is reprinted here with permission.