The following video gives a detailed description of loading a Perkins brailler with paper, while describing the parts of the brailler. It also reviews in detail how to remove paper from the Perkins brailler. The second time through, prompts are brief action prompts. This video is designed for users who are new to braille. It may be used by individuals who are blind or visually impaired.
Transcript
Hello! If you are watching this video, I will presume that you are new to braille, or that you’re with someone who is new to braille.
First, I will go through the process of loading and removing the paper while describing all of the parts of the machine. Then, I’ll go through the process again, but will only state action prompts as I load and remove the paper.
Using the Correct Paper
Before we begin, let’s make sure that you have the correct paper for the brailler. You can use braille paper up to 11 ½ inches wide and up to 14 inches long. Aim to use paper that is fairly stiff (between 60 and 100 pound weight) because lightweight paper such as photocopy paper can get jammed inside the machine, and braille on lightweight paper compresses easily and makes it more difficult to read. Today, I will be using 8 ½ x 11” cardstock from a paper supply company for my demonstration.
Familiarizing Yourself with the Parts of the Brailler
So, let’s have a look at the Perkins brailler. If you’ve carried it to a table or desk, you already know that the handle is on the top of the brailler. Position the brailler so that the handle folds down towards you.
Grasp the dust cover and pull it up and off of the brailler. If you don’t have a dust cover, I’d recommend getting one and keeping it on the brailler when it is not in use. It keeps out the dust that can gum-up the oils inside, and it also keeps unwanted items like paper clips, toys, and bits of debris from falling inside the brailler and jamming the machine.
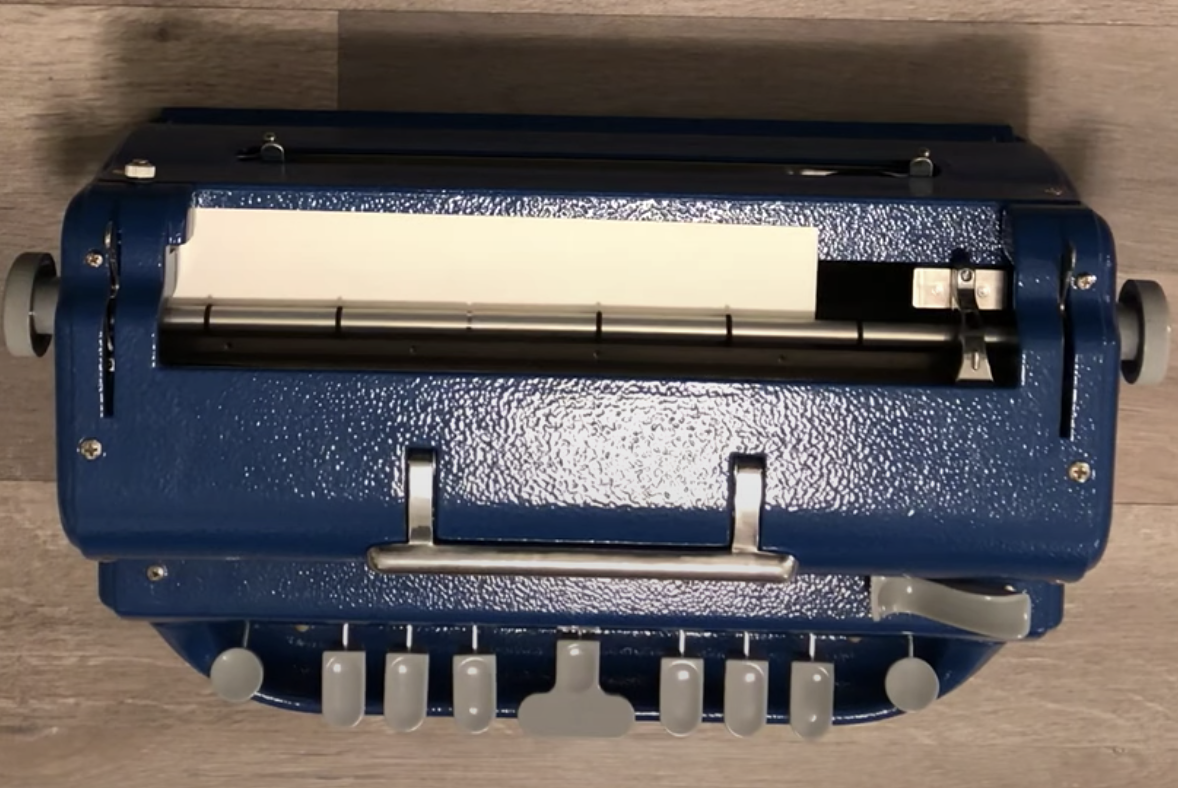
Using your left hand, reach around the left side of the machine. Just around the left edge and on the back near the top of the machine, you will find a small, rough knob. This is the paper guide knob. Twist it counter-clockwise to loosen it, and then try sliding it horizontally back and forth about a half an inch. If you are using 11 ½ inch paper, or would like your margin to be a one-inch margin (for example to accommodate holes or binding), slide the knob all the way to the left and tighten it by turning it clockwise. If you don’t do this and your paper is already punched with 3 holes, the paper sensor, which stops the paper from going too far into the machine, may prematurely stop you from rolling the paper all the way into the machine. If you are using narrower paper and/or you would like a ½ inch margin, slide the paper guide knob all the way to the right and tighten it by turning clockwise.
Next, I’d like you to reach forward with both hands, one on each side of the brailler. You will find a round knob on each side. These are the paper feed knobs that move the paper roller, which is inside the machine. At this time, you should not be able to turn the knobs. Now, move each hand up to the top of the brailler and slightly towards the back of the machine. You should find a lever at the top on each side, which you can move back and forth with one or both hands. Pull the lever all the way towards your body and let go of it. It should stay in that position.
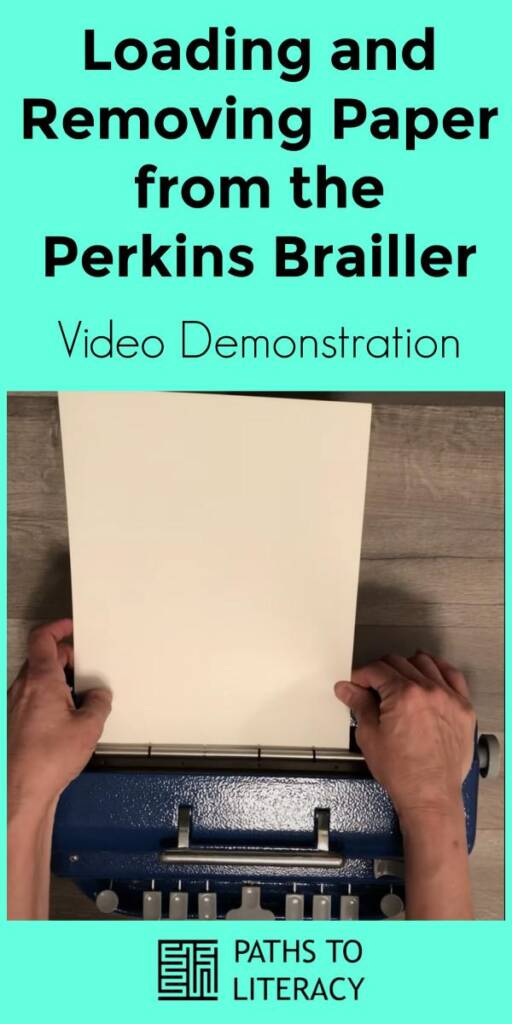
Next, grasp your paper in both hands so that it is oriented upright. If there are three holes for binder rings, they should be on the left. I like to hold onto both sides of the paper about 2/3 of the way down the page. Holding the paper, move your hands towards the back of the brailler and tilt the top of the paper away from you until it is horizontal, or parallel with the table or desk. The bottom of the page will now be able to rest on the one-inch wide horizontal shelf that runs left to right at the top back of the brailler. Ensure that the paper slides towards your body until it stops, and that it is between the embossing head, which you’ll feel as the hard metal piece jutting out towards the shelf from the gap that holds the rollers, and the stripper plate, which is directly below the embossing head (these two pieces make the braille). Next, ensure that your paper is slid completely to the left side of the brailler. Using your left hand, you will feel that the left side of your page is now tucked neatly under a little ledge. This is called the paper stop.
Hold the paper in this position with one hand and use the other hand to find the paper release. Push the paper release toward the back of the brailler. It should spring into place, thus gripping your paper between the paper rollers on the inside of the machine. If you have done this correctly, your paper should be firmly clamped in place.
Using one or both hands, find the paper rollers on the side of the machine. Turn the roller or rollers towards your body until you cannot turn the knobs any further. This has rolled the paper into the machine. If this doesn’t work for you, please pause the video and start over. If it did work, please move on to the next step with me.
The next step is the MOST IMPORTANT step in the process, and it must never be skipped. On the front of the brailler, close to your body, depress the key that is on the furthest left one time. This is the line spacing key. It engages the line spacing mechanism and sets the top margin so that you are ready to braille.
Now, on the front of the brailler, just above the keys, there is a ledge with an opening where the carriage lever is located. It is attached to the embossing head and stripper plate. Using your right hand, slide your fingers into the smooth groove and move the carriage lever all the way to the left. It’ll make a clicking sound and that is totally normal.
Setting the Margins
Now you are almost ready to braille. But, before you do, let’s set the margins.
Move the carriage lever and embossing head over to the right side of the paper where you’d like your braille to stop (which is obviously still on the paper). To do this, you’ll need to press down on the right side of the carriage lever and slide it along the groove on the front of the machine, or find the wide center key (or the space bar) on the front of the machine and depress it repeatedly until the embossing head is where you’d like your braille to stop at the end of each line. On the back of the brailler you will find two bumps (which are the left and right margin stops) that you can pinch, thumb on the top flat part of the bump, and pointer finger on the bottom rounded part of the bump. I usually do this with my dominant hand, but it could be done with either hand. Go to the one on the right, pinch while moving it to the left, or towards the center of the machine until it stops. Let go, and wiggle the margin stop to lock it into place. Your right margin is now set.
To set the left margin, find the groove in the carriage lever at the front of the machine and slide it to where you’d like your left margin to be. Now, find the farthest right key on the front of the machine, which is the backspace key, and depress it once. You need to do this in order for the margin to set correctly. Now, reach to the back of the machine and pinch together the left margin stop. Keep pinching until you’ve moved it as far to the right as you can. Let go, wiggle, and now your left margin is set.
Finally, check your margins by sliding the carriage lever to the right and back again. A warning bell will ding when you are within 7 cells of the right margin. This happens when you braille, too.
At this point, you are ready to braille. When I work with my students, I give them a verbal prompt to remind them to press “line feed, line feed, carriage return” at the end of each line of braille. This moves them to the next line, leaving a blank line between. This is for beginner braillers so that lines are a little easier to track when you take your paper out to read it. It goes like this. “Bump, bump, zoom.”
Removing the Paper
To remove your paper, I want to give you a serious warning. NEVER, EVER, EVER pull on the lever without making sure that your page is all of the way to the bottom. Use the side rollers on either side and turn them away from your body until they stop. If you forget and pull the lever while the paper is still partly in the brailler, the rollers release the paper and very often the brailler jams and the paper gets stuck and it is very difficult to get out without tearing. If you do end up doing this and you manage to get the paper out, depress the line feed button repeatedly on the left side of the keys on the front of the brailler to attempt to reset the brailler.
Let’s assume that you don’t make that mistake, simply roll the paper out by turning the side rollers away from your body until they stop. Pull the paper lever forward toward your body to release the paper. Reach back and pull the paper out of the brailler by pulling it horizontally away from your body.
But wait! You’re not done yet. Finish off by pushing the levers down towards the back of the machine. Push down and slide the carriage return on the front of the machine all the way to the right until it stops. This is the resting position. Place the cover back onto the brailler.
Well done!
Quick Review with Action Prompts
Now, let’s do that again with only a few action prompts.
Cover off, lever forward, paper in and to the left, lever back, roll towards your body until the paper stops, line feed once, zoom to the left, braille, bump-bump-zoom, repeat until done brailling, roll the paper out and away from your body until it stops, pull the lever towards you, paper out, lever down, carriage return to the right, cover on.
Happy brailling!