As a TVI, I am always looking for a quick “go-to” reference sheet for classroom teachers. I created this one for science educators to take the guess work out of creating accommodations for students with low vision and cortical visual impairment (CVI). Sometimes all a classroom teacher needs is an example to understand how to best accommodate their student. Voila!
These guidelines address general accommodations for students with low vision and cortical visual impairment. Please consult your Teacher of the Visually Impaired with regard to specific accommodations for your student.
The guidelines are separated into 2 categories: Low Vision (for students with ocular impairments), and Cortical Visual Impairment (for students with brain-based impairments which impact vision).
Accommodations for Low Vision
- Font matters! In general, students with low vision do best with simple fonts without serifs, like Arial or Calibri. Font size should be adjusted based on the specific vision impairment.
- Increase contrast. Some images, like the one pictured below on the left, would benefit from increased color contrast. The image on the right provides an example of the same image with the contrast increased. This simple accommodation can make the image much more understandable for a student with low vision.


The following is another example of contrast increase:


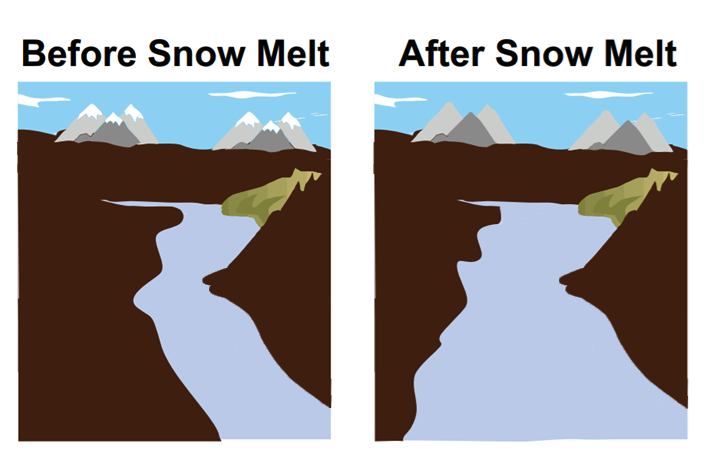
- Outline or separate relevant information. In images such as the ones on the left, outlining the information which is most relevant to the student’s understanding can be helpful. The line which designates the water/ice from the rock can be outlined in order to emphasize that they are different surfaces. The image on the right displays an example of this edit.


In the image below, the giraffe may be difficult to separate (visually) from its background. In examples such as these when the object and background are visually similar, consider presenting the giraffe by itself, accompanied by a separate picture of its environment.


Accommodations for Students with Cortical Visual Impairment (CVI)
- General: Students with Cortical Visual Impairment (CVI) have widely varying needs, just as students with low vision do. It is essential to consult with your TVI to best understand the student’s CVI phase and related accommodations. The following information is generalized with regard to CVI accommodations and may or may not pertain to your student.
- See also Guidelines for Modifying Books for Students in Phases I, II, and III.
- Sensory considerations: Students with Cortical Visual Impairment (CVI) often have difficulty processing auditory and visual input simultaneously. If the student requires that information be read aloud to them, consider presenting the pictures after auditory instructions. As always, it is particularly important that our students with CVI have access to a quiet area for assessments.
-
Use realistic photographs. For many students with CVI, realistic or abstract color drawings are challenging to interpret. If this is the case for your student, use color photographs to replace images such as the ones below.


Due to its abstract or cartoon quality, an image like the one below could potentially be difficult for a student with CVI to interpret. Consider using a photograph of trees in summer for the top image, and a photograph of trees in autumn for the bottom image.

Here is an example of the image edited to include photos in favor of cartoon images:

The drawing of a field mouse on the left is quite realistic and may be accessible to some students with CVI. Still, if color photographs are the most accessible image for the student, drawings such as this one should also be replaced with photographs such as the one below on the right.


- Simplify!
If abstract images are accessible to your student, some edits may still be necessary for optimal accessibility. In the image below, the white marks in the water and the light brown shapes in the mountains are clearly added to represent motion in the water and crevices in the mountains. Consider eliminating lines or shapes such as these, as the changes in color may not be interpreted as such by a student with CVI. These differences in color may be interpreted as objects separate from the water or the mountains.

Here is an example of the edited version. Note how the extra lines indicating shadows and movement have been eliminated.

Highlight salient features
The image below points out the most noticable, consistent, and important visual features by which the student can recognize a giraffe. These features can be referred to as “salient.”

Consider highlighting the salient features with the student’s preferred color, as shown in the example.

Use of color
Many students benefit from the use of their preferred color to help them to visually attend to important information. Consult with your Teacher of the Visually Impaired regarding how to use color throughout the classroom material. The color choice will vary depending on the preference of your student.